MAE Unix tutorial
Contents
[hide]- 1 Goals
- 2 Step 1: Overview
- 3 Step 2: Getting Connected Using SSH
- 4 Step 3: Understanding the Shell
- 5 Step 4: Intro-to-Unix tutorial
- 5.1 Moving Around
- 5.2 Copying Files
- 5.3 Symbolic Links
- 5.4 Compressing and Archiving
- 5.5 Looking at File Contents
- 5.6 Manipulating STDOUT
- 5.7 Editing Files
- 5.8 Paths, Modules and Making a .modulerc File
- 5.9 Copying files between your computer and the server
- 5.10 Establishing an Xterminal
- 5.11 Foreground and Background
- 6 The Importance of Being Nice
- 7 Extra Credit
- 8 Useful links
- 9 Some Random Online Resources to Learn More Unix
Goals
By the end of this introduction, you should be able to:
- Log in to the class computer system.
- Navigate and understand the directory structure.
- Copy, create and edit files and directories.
- Compress and uncompress files
- Copy files between your computer and your class home directory.
- Establish an Xterm connection.
Ask for help if any of these things aren't working by the end!
Step 1: Overview
WiFi Login
To log on to the MBL wireless choose the MBL-REGISTERED from the wireless list. Your username is your initials followed by the 5 digit number on the side of your MBL card (The hard plastic card that you received when you checked in at Swope, not your course ID badge). Your password is the same. E.g. if your name is Norman Pace and the your card has the number 12345 on the side then your login details are:
username: np12345
password: np12345
The Class Computer System
We will be running most programs on a Unix computer system built for
this course, so that you do not need to figure out how to install the
software on your machine. (There will be time during the course to
install and test software on your machine, but it takes too much time
for everyone to try to do this during a presentation.) You will
connect to one of the computational nodes using secure shell, or
ssh for short (described below). Every node is connected to another
computer that contains your class home directory and all the software we
will be using (in Unix speak, the class servers all mount the same
filesystem). No matter which computer node you connect to, you will
always be in your same home directory. Every compute node is
equivalent, we just use many of them to distribute the load when we run RAM- or CPU-intensive programs.
To connect to the servers you will need the username and password we gave you, along with the server for you to use. For example:<br\>
- dmarkwelch <- my username
- xC09hgV78s <- my password (not really)
- class-01 <- my assigned server
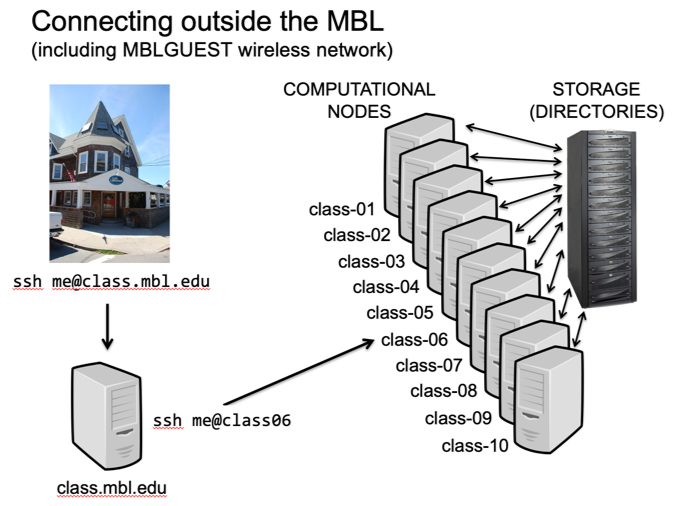
If you are trying to connect from outside the MBL network, say from the coffee shop down the street or Chicago (or if you use a VPN), you will need
to first connect a computer that serves as a bridge across our
firewall. Note that the MBL-GUEST network is considered outside of the
MBL network. Because you are connecting from outside the domain, you
need to specify the domain "mbl.edu" when you connect to the bridge.
Step 2: Getting Connected Using SSH
The SSH protocol establishes a secure connection to another computer, which becomes the "host" or "server". Your SSH window becomes a terminal of the host, as if you were sitting at the keyboard and monitor of the host. The commands you type are sent to the remote computer and executed there, not on your own hard drive. The results of those commands are displayed in the terminal window. You can establish multiple connections to the same host or to different hosts, each with its own terminal (which can get confusing).
- If you are using Mac OS X or a Linux installation, SSH is already installed and accessible from a terminal window. On a Mac, the Terminal program is in Applications -> Utilities. You may want to copy it to your dock because you will be using it a lot.
Open Terminal. You'll see a command line interface, beginning with a "prompt". The syntax of the ssh command is
ssh [username]@[host]
This is Unix manual-speak; something in brackets is information you have to provide. You don't actually type the brackets. In my case I would type:
ssh dmarkwelch@class-02
Depending on how your computer is interacting with the network you may need to use the full address of the host
ssh dmarkwelch@class-02.jbpc-np.mbl.edu
An alternative syntax uses a flag to specify the login name. A flag is one or two dashes followed by a letter or word, sometimes followed by a parameter. You will encounter many more flags this week. For the program ssh, -l ("dash L") is a flag for login name:
ssh class-02 -l dmarkwelch
or
ssh class-02.jbpc-np.mbl.edu -l dmarkwelch
You will prompted for you password. Passwords are case-sensitive. The text will not appear when you type. Type carefully.
Connecting for the first time
The first time you try to connect to a server you may see a message like this:
The authenticity of host 'class-02 (128.128.174.202)' can't be established.
RSA key fingerprint is 0c:7d:f4:52:fc:c9:71:6e:f1:cd:a8:90:66:40:39:d3.
Are you sure you want to continue connecting (yes/no)?
It is OK to answer "yes" Your computer simply doesn't recognize the fingerprint of the server, since it's never seen it before. You shouldn't get this message a second time, unless you connect to one of the different servers. (If you routinely connect to a server and one day get this message out of the blue, it may indicate a security problem. Or the SysAdmin changed the hardware on the server.)
Changing Your Password
You should change your password from the
difficult-to-remember-but-there-for-anyone-to-see-on-your-badge password
we issued to one you can remember easily. Your password should be at
least 8 characters long, contain a mixture of upper- and lower-case
letters, numbers, and symbols. It should be easy to remember by you but
hard for someone to guess. "Ju&4x_0d" is a good password but hard
to remember. "password" is easy to remember but easy for anyone else to
guess. "NCC-1701" isn't nearly as clever as you think it is, nor is
anything Elvish. "9VBattery-Staple!" is easy to remember and hard to
guess (unless you're an xkcd fan).
You can change your password with the change password command, which, because it's Unix, is abbreviated:
passwd
You will be prompted for your current password, again, what you type will not appear on the screen.
Then you will be prompted for a new password, then asked to retype the new password. If they match, you should see:
passwd: all authentication tokens updated successfully.
which is a hint that a lot of stuff went on in the background that
you don't want to know about, resulting in changing your password on all
the class machines, including class.mbl.edu, described below.
Connecting from outside the MBL or from MBL-GUEST
As a security precaution no one can connect directly to our servers from outside the MBL domain. The MBL-GUEST network is considered "outside the MBL." If you want to connect from MBL-GUEST, from your home institution, or from the coffee shop down the street, you must first SSH to the address "class.mbl.edu"
ssh [username]@class.mbl.edu
then from that connection
ssh [host](note that you do not need to specify the username if it is the same as the one you used to connect to class.mbl.edu)
Ending a Session
To end a session, just type
logout
and you'll be back to your original Terminal prompt.
Step 3: Understanding the Shell
When you connect to a server using ssh you are running a program called a shell
on the server. The shell interprets what you enter on the command line
and tells the server's operating system what to do. There are many
different shells; we will be using one called bash (the "born again shell"
which is a pun not worth getting into). The bash shell starts by
default, you don't need to do anything. The basic commands we are using
will work in any shell. If you know what you're doing and you'd rather
use another shell, go right ahead.
Note that your mouse and pointer do not work in the terminal window.
The terminal window does not send mouse commands to the server and the
shell wouldn't know what to do with them if it did. You will forget
this many times.
You will need to use the arrow keys, or shortcuts (described below).
Important obscure keys
There are some keys that are used a lot in UNIX commands but can be difficult to find on many keyboards. Find these symbols on your keyboard and note their common Unix name(s):
~ (tilde)
/ (forward slash)
\ (back slash)
| (pipe)
# (hash or number sign)
$ (dollar sign)
* (asterisk)
` (back tick) note that this is different from ' (single quote)
Basic Syntax
Unix commands follow the general format of:
- "command -options target"
- "command -options target"
Not all commands need options (sometimes called flags, and generally preceded by a single or double hyphen ("-" or "--")) or targets, but others require them. Some options are followed by a parameter value. There is always a space between the command and the hyphen of an option, even if we don't say so when we verbally describe a command. A space is usually required between an option and a parameter.
- For example:
- cd /class/mae-shared uses the command "cd" (change directory) and the target "/class/mae-shared" to move from the current directory into the directory called "mae-shared"
- ls -l /class/mae-shared uses the command "ls" (list), the option "-l" for long-list, and the target "/class/mae-shared" to list the contents of mae-shared in the "long list" format, which provides more thorough descriptions than does the regular "ls".
You can get help on any command by typing
[command] --help
and you can read the manual about a command by typing
man [command]
and, of course, there are a wealth of answers available using Google, many of them correct.
Notes on syntax for directory structure
You cannot point and click from the command line, or use the back button. Here are some tricks for navigating:
- One dot (.) indicates the present working directory. So, for example, "cd ." will keep you where you are (there are times when the single dot is actually useful).
- Two dots (..) indicates the parent directory of the present working directory. So, for example, "cd .." will move you back (up) one directory and "cd ../../" will move you up two, etc. It is not unusual to use many sets of two dots, but eventually it gets confusing and it is easier to move down from the top or from your home directory, thus:
- A forward slash (/) by itself or at the start of a path refers to the root (top) of the file system -- the folder that contains all other folders.
- The tilde (~) refers to your home directory. On the class machines your home directory is /class/[your username].
Some suggestions concerning file and folder names
White space on the command line separates commands, files, options, etc.
- Do not EVER use spaces in filenames. Use underscores, dots, or hyphens, or "CamelBack" notation. Spaces are separators. If you are stuck with a space in a filename created on your Mac or somewhere, surround the name in double-quotes so the shell can recognize what you're talking about:
mv "bad filename" good_filename
- Do not use non-alphanumeric characters (#@!*&^, etc.), especially ?, *, \, or / in filenames, as these have reserved functions and the filename will not be interpreted properly, even if surrounded by double-quotes.
- Dots are perfectly good separators in filenames and you can use as many as you want (though it would be weird to use more than one in a row).
- The suffix of a filename does not determine what "kind" of file it is (this is true for OS/X and Windows too, those operating systems just pretend it matters). The suffixes are just convention.
Quotes and Slashes
- Keep in mind the double quotes ("), single quotes ('), and the backtic (`) do different things are not interchangeable.
- Unix (and by extension, OS/X) uses the forward slash: / to designate directory structure. The backslash (\) has a different function. The backslash is used in MS-DOS and Windows to designate directory structure.
Wildcards (Globbing)
You can't use your mouse to select multiple files in a terminal window. The asterisk (*) can be used to match "anything of any length" and ? can be used to match "any single character"
ls *txt
lists everything ending in txt, and
ls files.??
lists all files with exactly two characters after the dot.
And of course you can get more fancy:
ls MyProject_*R1*fast?.gz
would list all the forward reads of your sequencing project, be they fasta or fastq
Compressed and Archived Files
Next gen sequencing analysis generates huge files and sometimes lots of files. Your life will be much simpler if you are comfortable compressing and uncompressing files and archiving sets of files.
Compressing files
Common compression algorithms such as gzip, zip, and bzip2 can drastically reduce the size of text files such as fastq and fastq files.
gzip my.fastq
will compress my.fastq to my.fastq.gz
gzip -d my.fastq.gz
will decompress my.fastq.gz to my.fastq. A gzipped fastq file take 30% or less of the space of the regular file. With some types of files, compression ratios of 1:10 are common.
Archiving files
Multiple files can be archived into a single file using the tar command (originally tape archive.
This helps organize your projects, makes them easier to share with
colleagues, and has a number of other advantages that will make your
sysadmin like you if you keep your rarely used data in tar files.
The command is tar, you want to compress files into a new file using flags and, where necessary, parameters:
tar -c -v -f myproject.tar *fa *fastq *log README
This will make a new file called "myproject.tar" which contains all
files in the current directory ending in fa, fastq and log as well as
the file called README. Because we added the -v flag (verbose)
it will display the name of each file on the screen as it is processed.
This can be handy for long lists of files. It does not delete the
files, you have to do that yourself when you're done. Pro Tip: If you
want to sound like a Unix geek (and that's why you're here, right?) you
can call tar files "tarballs."
You can see the contents of a tar file using -t for list (-l was already taken) or the more obvious --list
tar --list -f myproject.tar
You can extract the contents of a tar file, which does not delete the tar file
tar -x -f myprojects.tar
I thought tar was more confusing than that...
tar is a very old command, predating most common conventions. Back-compatibility means it can take flags in an archaic way that doesn't work with other programs. Basically, for tar and a few other programs the flags don't need to be separated, don't need a hyphen, and can occur in any order. Thus you will often see
tar cfv myproject.tar *fa *fastq *log README
and
tar xfv myproject.tar
which is convenient but pedagogically confusing. We will use this more confusing convention from here on out because everyone does and you'll need to get used to it. It could be important.
Putting it together
So wouldn't it be nice to compress files and archive them in one fell swoop? You can:
tar czfv myproject.tar.gz *fa *fastq *log README
will compress and zip verbosly (meaning it will print progress to the screen, which is helpful since it takes awhile to do this on big files. But v is optional).
As with any other filename, a zipped tar file does not need to end in tar.gz (or the hipper tgz). It is just a convention. But it is highly recommended to use the convention, so you can remember what's what.
- Pop quiz: what is a command that could be used to uncompress and extract myproject.tar.gz? (Hover for one answer)
Be Lazy
Typing is hard. You will make mistakes. There is no auto-correct. There are some tricks to make life easier:
- Auto complete: type the first few letters of a command or a filename and hit the TAB key. The shell will autocomplete the word as far as it can. If there is only one file that matches, it will complete the word. If there are several possibilities, autocomplete will go as far as it can. If you double-TAB at that point all the possible files that match will be listed.
- History: the shell remembers the lines that you have typed and you can scroll through them using the up and down arrows. This makes it easy to rerun the same command, or edit the line to run a very similar command will a lower chance of making a typo.
- There are also some shortcuts. For shortcuts, press the control (CTRL) or ALT (esc on a Mac) key while also pressing the appropriate letter:
CTRL+a moves the cursor to the beginning (a=beginning) of the line
CTRL+e moves the cursor to the end (e=end) of the line
ALT+b moves the cursor back (left) one word
ALT+f moves the cursor forward (right) one word
Don't Panic
You can't destroy the system or even bother it very much. You can't mess up other people's files. When it all goes south, "control-C" (^C) is your friend. It breaks whatever processes are running, and gives you your prompt back. Or, failing that, just close the Terminal and start again.
Step 4: Intro-to-Unix tutorial
Moving Around
Log in to your class server. Start by entering
pwd
This will print your working directory, i.ethe directory you are currently in: print working directory. Note that "print" does not mean "a printer prints it on paper" it means the output is sent to standard output, in this case your screen. A directory is the same thing as a folder.
This is your home directory. Note that it has the same
name as your username. You can change anything in your home directory
but you cannot change its name.
Note that your home directory is a subdirectory of the larger directory called users. This directory contains everything you will need to worry about for STAMPS.
Move to the directory called mae-shared in the users directory. Your home directory is in one subdirectory of users, so you need to move up one level, then down. One way to get there is to follow that route:
cd ../mae-shared
or you can get there from the top of the directory structure:
cd /users/mae-shared
Now see what's in the directory:
ls
Move into the fastqfiles directory. (Hold your mouse here ("hover") for a hint how to do this)
Now get the long report:
ls -l
Now sort the files by the time in which they were last altered, in reverse order:
ls -l -t -r
This is a handy combination to see what files were created by a
program you just ran; all the new files will be at the bottom of the
list. This is a boring example because all the files were created at
the same time.
(The ls command is a case when you can combine some options: "ls -ltr" will also work.)
That was a lot of options for a simple command like ls. In fact
there are about 80 options for ls! Type "ls --help" to see them all.
Now take a look at the output of ls -ltr
-rw-rw-r-- 1 dmwelch maeadmin  23398592 Aug  4  2016 TTAGGC_NNNNACGCA_4_R1.fastq.gz
-rw-rw-r-- 1 dmwelch maeadmin  12890405 Aug  4  2016 TTAGGC_NNNNCGCTC_4_R1.fastq.gz
-rw-rw-r-- 1 dmwelch maeadmin  21853345 Aug  4  2016 TTAGGC_NNNNACGCA_4_R2.fastq.gz
-rw-rw-r-- 1 dmwelch maeadmin  11835130 Aug  4  2016 TTAGGC_NNNNCGCTC_4_R2.fastq.gz
-rw-rw-r-- 1 dmwelch maeadmin 108944229 Aug  4  2016 TTAGGC_NNNNCTAGC_4_R1.fastq.gz
-rw-rw-r-- 1 dmwelch maeadmin    191767 Aug  4  2016 TTAGGC_NNNNGACTC_4_R2.fastq.gz
-rw-rw-r-- 1 dmwelch maeadmin    208245 Aug  4  2016 TTAGGC_NNNNGACTC_4_R1.fastq.gz
-rw-rw-r-- 1 dmwelch maeadmin 102467172 Aug  4  2016 TTAGGC_NNNNCTAGC_4_R2.fastq.gz
-rw-rw-r-- 1 dmwelch maeadmin  49171429 Aug  4  2016 TTAGGC_NNNNGAGAC_4_R1.fastq.gz
-rw-rw-r-- 1 dmwelch maeadmin  44569654 Aug  4  2016 TTAGGC_NNNNGAGAC_4_R2.fastq.gz
-rw-rw-r-- 1 dmwelch maeadmin  58594821 Aug  4  2016 TTAGGC_NNNNGCTAC_4_R1.fastq.gz
-rw-rw-r-- 1 dmwelch maeadmin  53255083 Aug  4  2016 TTAGGC_NNNNGCTAC_4_R2.fastq.gz
-rw-rw-r-- 1 dmwelch maeadmin  84920631 Aug  4  2016 TTAGGC_NNNNGTATC_4_R1.fastq.gz
-rw-rw-r-- 1 dmwelch maeadmin  79443476 Aug  4  2016 TTAGGC_NNNNGTATC_4_R2.fastq.gz
-rw-rw-r-- 1 dmwelch maeadmin  35476557 Aug  4  2016 TTAGGC_NNNNTCAGC_4_R1.fastq.gz
-rw-rw-r-- 1 dmwelch maeadmin  32561632 Aug  4  2016 TTAGGC_NNNNTCAGC_4_R2.fastq.gz
This displays the filetype, permissions, owner, group, file size, creation time and filename.
Permissions are a bit outside the scope of this tutorial but they will probably come up during the course.
It's hard to read the file size when there are that many digits, so try
ls -ltrh
The h denotes human readable
A note on fastq file name conventions: These files have been
processed by Illumina's CASAVA program and our own in-house scripts to
separate read data based on index and bar code. The first six
characters are the index sequenced during the indexing read step; the 10 characters after the underscore designate our internal bar code and are the first 10 bases sequenced in the forward read step. During the sequencing run, every cluster is read in forward (R1) and reverse
(R2) directions, which are determined by the Illumina adapters. For
every sequence in an R1 file there is a corresponding sequence in the R2
file.
And a note on verbal conventions: This is as good a place as any to point out that there is always
a space between a program name and flags and (almost) always a space
between flags and parameters. But people very rarely designate the
space when they are speaking. If someone says "type el es dash el" they
expect you to type "ls -l" not "ls-l" and this will probably trip you
up sometime this week.
Now move back to your home directory by moving up
cd ../[username]
or by coming down from the top
cd /users/[username]
or simply use the tilde to designate "home"
cd ~
in fact, going home is the default of cd:
cd
takes you to your home directory. Phew!
Copying Files
Make a directory for this exercise with the make directory command
mkdir myunixdemo
(you can call it anything you want)
Now copy some of those fastq.gz files you saw in /users/mae-shared/fastqfiles to your new directory. Read this whole section first, though.
The syntax for copying files is
cp [SOURCE] [DESTINATION]
You do not need to be in SOURCE or DESTINATION to copy, although you'll usually be in one or the other.
One way to do this would be:
 cp /users/mae-shared/fastqfiles/TTAGGC_NNNNACGCA_4_R1.fastq.gz TTAGGC_NNNNACGCA_4_R1.fastq.gz
 cp /users/mae-shared/fastqfiles/TTAGGC_NNNNACGCA_4_R2.fastq.gz TTAGGC_NNNNACGCA_4_R2.fastq.gz
Which suggests that you could call the DESTINATION file anything you want
 cp /users/mae-shared/fastqfiles/TTAGGC_NNNNACGCA_4_R1.fastq.gz my_R1.fastq.gz
 cp /users/mae-shared/fastqfiles/TTAGGC_NNNNACGCA_4_R1.fastq.gz my_R2.fastq.gz
If you don't want to change the filename, you can just specify the destination directory. And you can use "." to designate "this here directory where I am right now."
 cp /users/mae-shared/fastqfiles/TTAGGC_NNNNACGCA_4_R1.fastq.gz .
 cp /users/mae-shared/fastqfiles/TTAGGC_NNNNACGCA_4_R2.fastq.gz .
That's still too much typing, so let's just copy using file globbing:
cp ../mae-shared/fastqfiles/TTAGGC_NNNNACGCA_4_R?.fastq.gz .
If you were still in mae-shared/fastqfiles you could have used
cp TTAGGC_NNNNACGCA_4_R?.fastq.gz /users/[username]/myunixdemo
or just
cp TTAGGC_NNNNACGCA_4_R?.fastq.gz ~/myunixdemo
Each of these should make sense to you, ask if they don't.
Now go ahead and copy two fastq.gz files into your myunixdemo directory. They should be forward ("R1") and reverse ("R2") files with the same internal bar code (i.e NNNNACGCA).
Compressing and Archiving
Now list all the files in the directory using a flag that lets you see the file sizes. (Hover for hint) Now unzip all of the gzip files
gzip -d *gz
(Note this would not be the best way to unzip a whole directory of real Illumina fastq files, but these files have only(!) 100,000 reads each)
Now list all the files again, and notice the difference in file size. This is why we like to compress!
Now make a compressed tarball of all of the files (Hover for hint)
Now confirm that there actually is a tar file with the appropriate name in your directory. Don't just assume it worked!
Once you've confirmed tar worked, delete all the fastq files with the remove command
rm *fastq
Note: there is no recycle bin or undo in shell. Be very careful with wildcards and the rm command.
Check the directory contents with ls -l. Neat and tidy!
Now extract the tarball. (Hover for hint)
Note that unlike unzipping a compressed file, extracting a tarball does
not make it go away. Also, creating a tarball does not make the
original files go away. If you create tar archives without deleting the
original files, you will make your SysAdmin angry, which is never a
good idea.
Looking at File Contents
Let's take a look at what's in one of the files. A simple command for this is "more"
more TTAGGC_NNNNACGCA_4_R1.fastq
(or whatever file you want to look at).
You can use the spacebar to scroll down through the file. Notice that
the arrow keys don't help you, although you can scroll along your
terminal window. When you get bored, type "q" to quit (without the
quotes). The contents should look similar to what you saw in this
morning's example of a fastq file.
Another useful command is "less"
less TTAGGC_NNNNACGCA_4_R2.fastq
You can use the spacebar, and also the arrow keys. There is also a
special prompt at the bottom of the screen (":") where you can type
commands that let you search and move around. See the man page for
details. Why is this much better program called less? Because less is more. Aren't Unix programers clever?
Two other useful commands are head and tail. Their
default action is to print the first (or last) 10 lines of a file to
stdout. This is a convenient way to see what is in a large file without
loading it into more or less. You can specify how many
lines you want to override the default. This is how I made the small
fastq files from original files with millions of fastq sequences.
Pop quiz: A fastq sequence is 4 lines long and there are no empty lines in these fastq files. Make a new file that contains only the first 1000 sequences from an existing fastq file. Hint: use the man page to find the right syntax for head. (Hover for answer)
Manipulating STDOUT
Type "history" to see what you've so far. Notice that when you type "history" the result goes to the screen. This is called standard output or STDOUT. You can redirect stdout to a file instead.
history > HistoryFile
This is a very useful way to log what you did during a session. We
will use this arrow symbol frequently to redirect output. A single
arrow will overwrite a file if it already exists. So every time you do
this you will overwrite your old HisgtoryFile and bash will not warn you this is happening. Maybe it would be better to call it history20200928 or whatever today's date is.
You can use two arrows to append stdout to an existing file:
history >> AllMyHistoryEver
Let's go back to the last head command. What if we only wanted sequences 11-20? Well, this would work
head -n 80 TTAGGC_NNNNACGCA_4_R1.fastq > first20.fastq
tail -n 40 first20.fastq > 11-20.fastq
But that is ugly and laborious. Wouldn't it be nice to combine this into a pipeline? Try this
head -n 80 TTAGGC_NNNNACGCA_4_R1.fastq | tail -n 40 > 11-20.fastq
See what we did? The | symbol or pipe (the character above the "\" on a standard US keyboard) takes the stdout of one command and sends it to the next command. This eliminates intermediate files, which could otherwise be very large in the next gen world. This is a very simple example of a very powerful concept in Unix, and the basis of making pipelines in shell.
Editing Files
A very simple way to create a small text file is witht the cat command. Short for "concatenate" cat can be used to merge a bunch of files, with the contents of the second file concatenated after the last line of the first, etc.
cat file1.txt file2.txt file3.txt > allfiles.txtOr better yet
cat file?.txt > allfiles.txtYou can also use cat to send standard input to a file:
cat > newfile.txt
Hello world!
This is a simple text file
Then enter Ctrl-C to stop the input and get your prompt back.
more newfile.txtVery simple!
OK, that's all well and good, but what if we want to edit a file? Where's the shell version of Word? Well, this is where we start to get sort of user-unfriendly, and all I can say is I'm sorry. Editing files in shell takes some getting used to. There are many programs that can be used and most are installed on any standard Unix/Linux installation. Here we will use Emacs. Emacs is a very powerful editor, but if you've been raised with WYSIWYG and mouse clicks it seems archaic to have to use ALT and CTRL keystrokes.
emacs newfile
Notice that the look of the terminal changes. This is your "blank
page." Go ahead and start typing. Be traditional and type "Hello
world!"
Remember that your mouse with not move the cursor!
To exit and save type CTRL-x CTRL-c (hold the control button and press x
then c; you can think of CTRL-x as selecting the "File" pull down menu
in Word and CTRL-c as selecting "Close"). You'll see that you're asked
if you really want to save and exit; type "y" (or "n" if you want to
stay). There are emacs equivalents of "File->Save" (CTRL-x CTRL-s)
and "File Save As" (CTRL-x CTRL-w). In fact, you can do most anything in emacs
Use emacs to open newfile again, and add some more text, then exit.
There are all sorts of other emacs commands, see the man page or
countless web pages. Hopefully the CTRL-x CTRL-c combination will get
you through most of the course.
Paths, Modules and Making a .modulerc File
When you log in to a Unix shell, a bunch of stuff gets executed in the background. For example, the shell is told all the places to look for executable programs by way of a special environment variable called PATH. If a directory is in your PATH, any executable (i.e. a program or script) in that directory can be used directly without having to tell the shell exactly where the program is located. For instance you can type
blastn
and the shell knows to execute /bioware/blast+-2.2.31/bin/blastn
because every shell that starts in a class server is told that
/bioware/blast+-2.2.31/bin/blastn is part of the PATH.
However, problems can arise when there are two programs with the same
name in two different directories. For example, the WU-BLAST suite has a
program called "blastn" and the NCBI blast+ suite has a program called
blastn. And there's a new version of blastn in the blast 2.6.0 that we
haven't decided to use as default.
Because of all the pipelines used to process and analyze nextgen data
there can be a lot of name conflicts. One way to avoid this problem is
to use modules. A module is a set of environment variables and
anything else needed to run a specified set of programs. For example,
when you log in to a class server, most of the software you will use is
loaded into your PATH by way of a module called mae. Try this:
which blastn
and now
module unload mae
which blastn
module load mae
which blastn
In order to make sure all of the programs we will be using play nicely with each other we will be modifying the mae module as necessary, and you may upon occasion need to load or unload it, or load a different module.
But wait! That's awful! Can't we set it up so that this happens automatically? Yes! One of the great things about Unix is that you can control almost every aspect of what happens when you start a shell. You can change the way your prompt looks, you can set up your own special commands (aliases), you can specify very complicated ssh commands with a simple name. And you can load or unload modules. All you need is a file called .modulerc.
dot files
But first, a brief digression. Notice that .modulerc starts with a period. There is no prefix. This is an example of a "dot file". They're also called hidden files because these files don't appear when you type "ls". The files (and even directories) that control all the stuff in the background usually begin with a dot so that they stay out of the way when you're doing day-to-day things in your directory. If you want to get fancy you can add .profile and .bashrc files to your home directory to control the look and feel of the shell. If you type ls -a (for all), you'll see that you already have a .ssh directory that contains information about your ssh history. After you use R tomorrow you will have a directory called .rstudio that contains files controlling your RStudio environment and history.
So let's make a .modulerc file. In your home directory
emacs .modulerc
Now enter the following text
 #%Module 1.0
 module load mae
That's it, very simple. You could add any other load or unload commands that you wanted, but this will do it for now. CRTL-x-c to save and exit.
Copying files between your computer and the server
Now that you're comfortable with your Unix environment, how do you
get files to and from the server? The most straightforward way is to
copy them, just like the copy command we used above. Except this time
it's across the internet so it needs to be secure (encrypted). Thus scp or secure copy.
The syntax is just like cp with SOURCE and DESTINATION except you also need to specify the machine your are copying to, using syntax similar to ssh:
scp [username]@[machine1]:[path]/[file] [username]@[machine2]:[path]/[file]
transfers the file(s) specified in SOURCE from your home directory on machine1 to your home directory on machine2. As with cp you can rename the destination file, use the ~ to specify your home directory, the "." to specify the current directory, and wildcards. Because you are usually connected to the internet over a wireless DHCP, you don't usually know the name the internet is giving to your laptop. So it's easiest to open a new terminal (either a Mac Terminal or a second terminal window within MobaXterm) so that you can use the dot convention in place of your machine name. Also, your laptop may not be configured to accept incoming requests for scp. So, from a new terminal
scp dmarkwelch@class02:myunixdemo/*tar.gz Documents/MAE
will copy all my compressed tarballs to a directory on my Mac called
MAE in my Documents directory. In this case it's only one file,
but it was easier to use the * than to type out the filename!
If I am off campus or otherwise need to use class.mbl.edu, I just use that as the host since it also mounts my home directory:
scp dmarkwelch@class.mbl.edu:myunixdemo/*tar.gz Documents/MAE
Mac users should note that a terminal window on a Mac runs a flavor of Unix very similar to what we've been using on the class servers. You can pwd, mkdir, rm, cd, ls, tar, and everything else on your laptop. So you can cd to the directory of your choice before you scp, of make a new directory before transferring files into it. MobaXterm users will need to explore a bit to learn how the MobaXterm environment interfaces with their directory structure. Alternatively, MobaXterm users can upload and download files using the left menu. Poke around until you get the hang of it.
From outside the MBL, you cannot scp directly to the class computers. Instead use class.mbl.edu, which also mounts your home directory just like the compute nodes
scp dmarkwelch@class.mbl.edu:myunixdemo/*tar.gz /Documents/STAMPS2017
File Transfer Clients
Various programs exist that carry out the scp (or similar) protocol in a friendly GUI. We recommend FileZilla because it easy to install and use and versions are available for OSX and Windows. Download and install FileZilla if you can't use scp (or don't want to). Open the program, click on Open Connection, and enter your server name, username, and password in the appropriate boxes, and click Connect. You can use the resulting window just like a folder on your desktop, including drag-and-drop. Hard to get easier than that!
- (Unless you use Firefox, in which case you can download the Add-on FireFTP and run it from Firefox, which is even easier!)
Note that sometimes scp from the command line is faster, since you can use wildcards with scp to move lots of files at once that may be hard to grab as a group with a GUI program.
Using scp or one of the clients, move some files back and forth from your computer to your home directory.
Foreground and Background
You haven't noticed yet, but when you type a command and then hit return/enter, there is a very, very slight delay before your prompt returns while
the command executes. Some programs take longer (much longer) to execute, in which case you have no prompt and can't do anything else. This is because
the program is running in the foreground of your shell. To have it run in the background add an ampersand (&) to the end of the command line. Then the program will run in background and you can continue to work.
If you launch a program in foreground and then decide you want to put it in background, you can do that too. Crtl-z will suspend the job and return your prompt. Type bg to send it to background. You can type fg at any time to bring the program back to the foreground (for instance if it is waiting for user input).
You can execute multiple programs in background, though eventually they may start to compete for resources
on the server (memory, CPU time, network bandwidth). You can see the status of your various jobs with the command jobs and manipulate different background jobs, but that's outside the breadth of this tutorial (but not hard, if it comes up).
On many but not all unix systems, running programs in background can also prevent them from crashing if your connection is interrupted because of a network problem or a problem on your computer (like closing the lid). However, a more reliable method of ensuring that you don't lose your work if you lose your connection is to use screen, which we describe on this hackmd page.
Extra Credit
Modifying Your Profile
You can make Unix behave almost any way you want. One way to influence your Unix environment is to create a file in your home directory called ".profile" (note the leading dot). When you log on, the shell reads the contents of your .profile and modifies your environment accordingly. We will make a simple modification.
1. Use emacs to create and open a file called .profile in your home directory.
2. Add the following line to the file
 PS1='\h//\W> '  # current directory only
 PS1='\h//\w> '   # path to current directory
The first line modifies the prompt to display the name of the host
and the full path to the current directory. Sometimes the full path
takes up too much space on the command line, especially if you have a
small screen. The second line modifies the prompt to display the current
directory.
3. Chose one of these two ways to modify your prompt by adding a hash (#) to the other line. The hash symbol tells the shell to not pay attention to anything after it on the same line. You can use it to add comments to a line, like the examples above, or to "comment out" a line that you don't want the shell to execute. "Commenting out" is often better than deleting because you keep the information for later.
4. The next time you log on, the shell will read .profile and your prompt will look different. Alternatively, tell the shell to use the information in .profile right now
source .profile
Useful links
The following table contains a list of commands that will allow us to navigate through the directory structure. The entries are linked to their Wikipedia pages, which contain very useful examples.
| Linux/Mac | MS-DOS | Description | Syntax (Linux/Mac) |
|---|---|---|---|
| pwd | chdir | print working directory | pwd |
| ls | dir | list directory contents | ls |
| history | doskey /history | display command history | history |
| cd | cd | change directory | cd directory_name |
| mkdir | mkdir | make directory | mkdir directory_name |
| cp | copy | copy files | cp original_filename copied_filename |
| mv | move | move files (the same as rename files) | mv original_filename moved_filename |
| rm | del | remove file(s) | rm filename |
| clear | cls | clear the screen | clear |
| exit | exit | quit command line | exit |
- UNIX/Linux command line cheat-sheet: http://fosswire.com/post/2007/08/unixlinux-command-cheat-sheet/
- MS-DOS full command list: MS-DOS commands
- A unix shell tutorial from Software Carpentry: [1]
Here is a list of useful less commands
| Command | Description |
|---|---|
| spacebar | display next page |
| return | display next line |
| n f | move forward n lines |
| b | move backward one page |
| n b | move backward n lines |
| / word | search forward for word |
| ? word | search backward for word |
| h | help |
| q | quit |